
How Long Does a Standing Seam Metal Roof Last in Mason City, IA?
A properly installed standing seam metal roof in Mason City lasts 40 to 70 years depending on panel material, gauge, finish quality, and how well the system is maintained. Steel panels with Kynar 500 finishes and concealed fasteners are the most durable option in Iowa❜s freeze-thaw and hail-prone climate. Most standing seam manufacturer warranties run 30 to 50 years and require installation by a certified contractor to stay valid.
- Galvalume steel — most common choice for Mason City homes and commercial buildings; excellent corrosion resistance
- Aluminum panels — lighter weight and naturally rust-resistant; used in Iowa for premium residential projects
- Concealed fasteners eliminate exposed penetrations — the leading cause of early failure on exposed fastener metal roofs
What Standing Seam Metal Roofing in Mason City Actually Involves
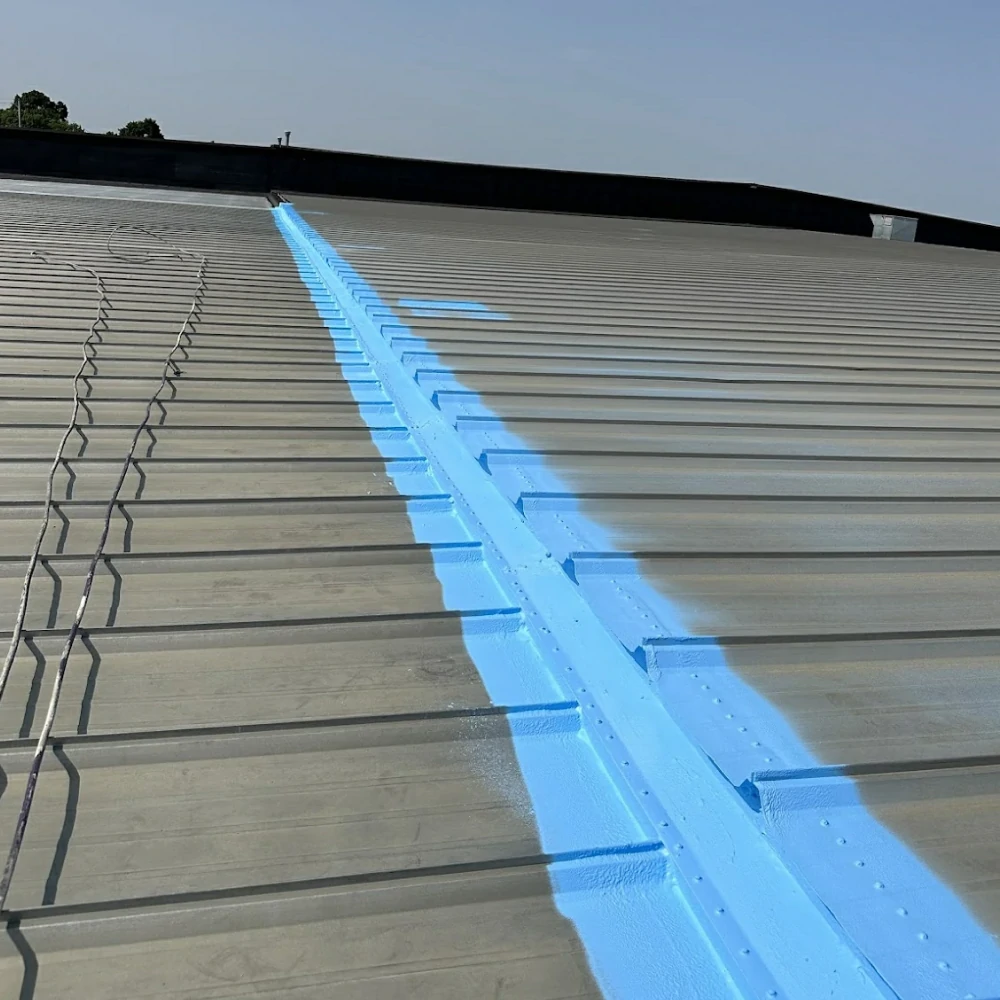
A proper standing seam install covers far more than locking panels together and calling the job done. Mason City's commercial and residential roofing experts handle the full system — deck prep, high-temperature underlayment, ice and water shield along eaves and valleys, panel delivery or job-site fabrication, clip attachment, panel seaming, ridge work, trim, and flashing at every penetration. Each part has a job. Skip the clips and the panels cannot move with Iowa❜s temperature swings. Skip the underlayment and condensation rots the deck from below.
Iowa building code requires ice and water shield along the eaves on all Mason City residential roofs. On standing seam installs this protection is especially important — metal panels shed water fast and direct all of it to the eave edge at once. We include it on every install without exception. What a proper standing seam install covers:
- Deck check and plywood overlay if existing decking needs it
- High-temperature synthetic underlayment across the full roof
- Ice and water shield along eaves, valleys, and penetrations
- Concealed clip installation to manufacturer spacing spec
- Panels — job-site roll formed or pre-cut, depending on roof shape
- Panel seaming with a mechanical or hand seamer to spec
- Ridge cap, hip trim, rake trim, and eave trim
- Flashing at chimneys, skylights, walls, and all penetrations
How Standing Seam Differs From Other Metal Roofing Systems
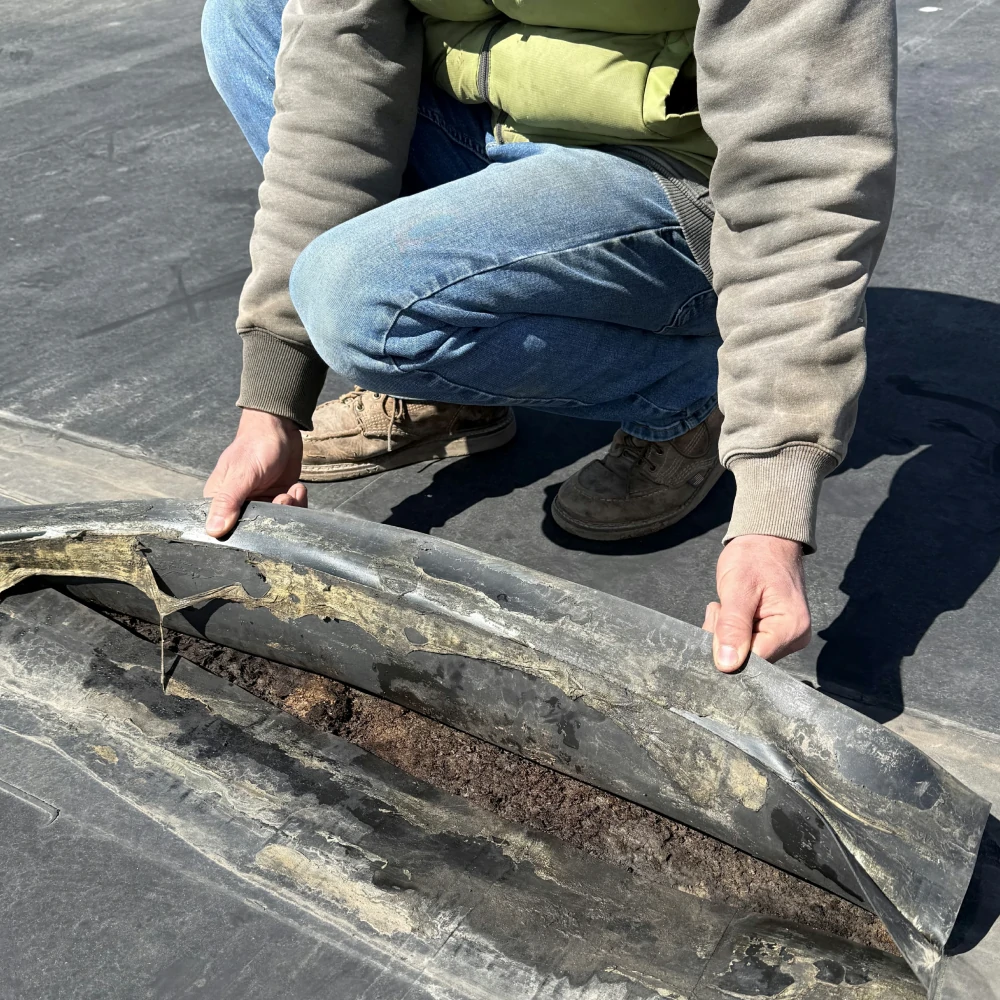
Standing seam panels lock together at a raised seam. The fasteners are concealed under the seam — nothing penetrates the face of the panel. Rain, snow, and ice never touch a fastener. The panels float on clips that allow expansion and contraction as Iowa temperatures swing from -20°F in January to 100°F in July. That movement is designed in — not a flaw.
Exposed fastener panels — R-panel and screw-down systems — have screws that go right through the panel face. Those screws are capped with rubber washers that compress over time, dry out in Iowa❜s UV, and eventually allow water in. Exposed fastener systems are common on Mason City pole barns and ag buildings where low upfront cost is the priority. Standing seam is the right choice for homes and commercial buildings where a 50-year maintenance-free system justifies the higher upfront cost. The key differences:
- Standing seam — concealed fasteners, panels float on clips, 40 to 70 year life
- Exposed fastener — screws through the face, lower cost, shorter maintenance cycle
- Standing seam accommodates Iowa❜s extreme temperature swings through clip design
- Exposed fastener systems need periodic fastener inspection and re-torquing
- Standing seam is the standard for residential and commercial longevity applications in North Iowa
How to Choose the Right Standing Seam Panel for an Iowa Home or Building
The right panel depends on roof pitch, building use, snow load, and how long you plan to own the property. For most Mason City residential projects, 24-gauge Galvalume steel with a Kynar 500 paint finish is the recommended starting point. The heavier gauge handles North Iowa hail impact better than 26-gauge. The Kynar finish resists UV exposure and Iowa❜s temperature cycling without fading or chalking over decades.
Seam height matters too. Taller seams — 1.5 to 2 inches — perform better on lower-pitched roofs where water and ice have more time to back up along the panel. Shorter seams work on steeper pitches where water sheds fast. Choices to work through before signing:
- Panel material — Galvalume steel for most projects, aluminum for premium residential
- Gauge — 24 gauge minimum for hail-prone Cerro Gordo County
- Finish — Kynar 500 for long-term color and UV performance in Iowa
- Seam height — taller seams for lower-pitched roofs
- Panel width — narrower panels reduce oil canning on wide flat planes
- Clip type — fixed vs. floating clips based on panel length and expected thermal movement
What the Standing Seam Installation Process Looks Like Day by Day
Day one starts with deck prep and protection. The yard gets covered before any tear-off begins. The deck gets checked and repaired where needed. High-temperature underlayment and ice and water shield go down before a single panel is set. On job-site roll-formed installs, the roll former arrives on day one or two and panels are fabricated to the exact length of each roof run — no end laps, no extra seams.
Iowa weather is part of every standing seam job. Panel seaming and trim sealant need temperatures above 40 degrees to perform correctly. Wind is a bigger factor on metal panel jobs than on built-up or membrane roofing installations — large panels are hard to control in a gust. We give you a real start window and call the same day if weather pushes the schedule. Most Mason City residential standing seam installs complete in three to seven days depending on roof complexity.
- Day 1 — Deck prep, underlayment, and ice and water shield
- Day 2 — Clip installation to manufacturer spacing
- Day 2 or 3 — Panel roll forming or delivery, panel set and lock
- Day 3 or 4 — Panel seaming with mechanical seamer
- Day 4 or 5 — Ridge, hip, rake, and eave trim with proper sealant
- Day 5 or 6 — Flashing at penetrations, final inspection, and cleanup
How to Verify Your Standing Seam Installer Has the Right Skills and Equipment
Standing seam installation requires training and equipment that most general roofing contractors do not have. A crew that installs standing seam regularly owns a mechanical seamer and knows how to calibrate it for the panel system going on the roof. A crew that dabbles in metal roofing rents tools and learns on your project.
Ask whether the contractor owns a roll former for job-site fabrication. Job-site roll forming produces panels that run the full length of each roof plane without end laps — a significant quality advantage on long roof runs. Contractors who use pre-cut panels with end lap seams introduce additional potential leak points that do not exist on a roll-formed install. Verify before you sign:
- Iowa contractor license number on the contract and the truck
- Manufacturer certification for the specific panel system being installed
- Ownership of mechanical seaming tools and roll former for job-site fabrication
- Number of standing seam installs completed in North Iowa in the last 12 months
- Three local standing seam references — drive past at least one in Mason City
- Written scope listing panel brand, gauge, finish, seam height, and clip type
- Named project lead with direct standing seam experience
How Proper Installation Prevents the Most Common Standing Seam Problems
Most standing seam problems in Mason City trace back to install errors — not the panels. Wrong clip spacing is the most common structural mistake. Clips that are spaced too far apart for the panel length allow the panel to buckle under Iowa❜s temperature extremes instead of floating smoothly. The result is oil canning — visible waviness in the flat field of the panel.
Oil canning does not affect performance, but it is the most common aesthetic complaint on standing seam roofs. It is managed through correct clip selection, proper panel width for the application, and experienced installers who understand how steel moves through Iowa❜s extreme temperature range. Common install errors that cause standing seam problems:
- Wrong clip spacing — panels buckle instead of float under thermal movement
- Missing high-temperature underlayment — condensation rots the deck from below
- Improper valley details — water backs up under panels at inside corners
- Sealant substituted for proper trim pieces at ridges and rakes
- End laps instead of full-length panels — extra seams mean extra leak risk
- Panels installed without room for thermal expansion at fixed end points
- Flashing at penetrations done with incompatible materials that corrode over time